Autodesk Educational Community
Historically, autodesk has been very generous in providing free software to students. At the time of publication, students can download a one-year educational license of revit architecture 2022.
While the revit educational software incorporates all the functionality of the professional software, it may not be used for commercial or for-profit purposes.

Register with autodesk
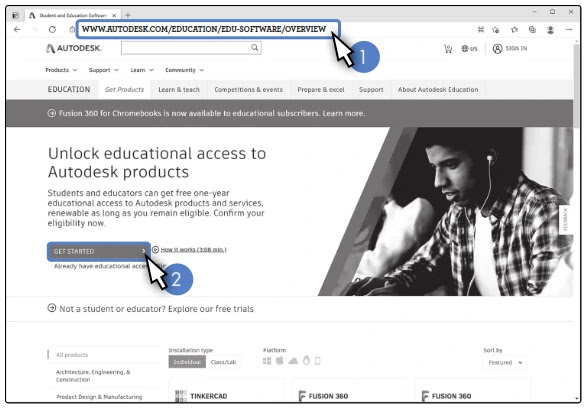
Www.autodesk.com/education/edu-software/overview in your web browser.
• step 2: click the get started button.

• step 4: click the next button.
• step 5: complete the requested registration information. It is recommended that you use your school email address in the email field.
• step 6: click the create account button.
• step 7 (not shown): autodesk requires that you activate your account before you can download revit . Check your email for additional instructions provided by autodesk to activate your account.
Download Revit

• step 1: open the autodesk website:
Www.autodesk.com/education/edu- software/overview in your web browser.

• step 2: click the sign in button.
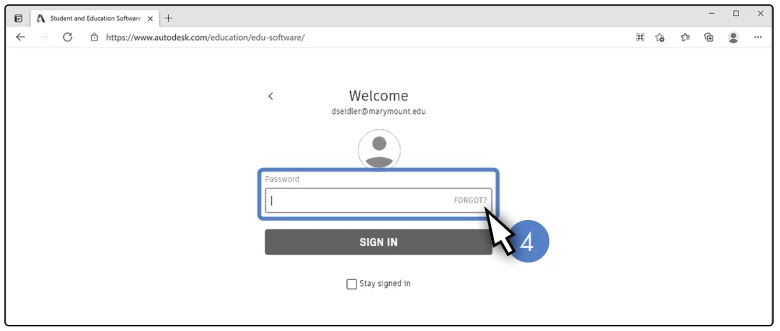
• step 3: sign in to autodesk’s student website with the autodesk id created during the registration process.

• step 4: sign in to autodesk’s student website with the password created during the registration process.
Tip: make sure your computer meets the minimum requirements for revit 2022.
Once you have signed into your autodesk education account, you can download your free version of revit .

• step 6: click the install button
• step 7: once the download is complete, double-click the revit_2022 setup file located in your web browser or your downloads folder.

• step 8: the autodesk install dialog box shows the progress preparing the revit_2022 setup file for installation .
Install Revit

The installation process involves both downloading and installing revit 2022 on your computer. The entire process will vary based on the speed of your internet connection .
• step 1 (optional): tell the autodesk installer where to install revit on your computer. Most users will use the default install locations as show in this example .
• step 2: click the install button .

• step 3: the installation percentage allows you to follow the progress. You should keep your computer connected to a reliable internet connection until installation is complete .

• step 4: click the restart button when the installation is complete.
Activating Revit 2022
The first time you open revit, autodesk will request you register the software . You must be connected to the internet to activate revit .

• if you have a network license or serial number (not common), click the appropriate button in the other license types section of the activation dialog box .
The autodesk licensing dialog box prompts you to sign in with your autodesk account . This is the same email address and password used on page 7 to download revit .

• step 2: follow the prompts to sign into your autodesk account .

• step 4: click the enter code button to verify your sign in and activate your revit 2022 software license
Installing family content packs
Beginning in revit 2021, autodesk changed how library content is installed . This change installs a minimal set of content with revit . Other content libraries must be downloaded and installed separately from the main installation of the software .

• step 1 (not shown): visit and www.autodesk.com/download to locate the appropriate family content pack for your revit version .

• step 3: launch the installer file downloaded in the previous step .
• step 4: the autodesk install dialog box shows the progress preparing the content pack setup file for installation .
Once the installation completes, both imperial and si libraries of revit families are available for use on your computer .
Revit project files
A revit project file ( .rvt) holds all of the information for a building .

Create a new project
• step 1: open revit architecture 2022 by double-clicking on the desktop icon .

• step 2: click the new project link on the revit welcome screen .
Tip: interior designers and architects should change new project template from construction to architecture as illustrated in the following steps .
Revit prompts you to select a template file for the new project .
• step 4: click the ok button to start the new project .
Open an existing project
• step 2: navigate to the folder with your revit files . Click once on the file you want to open .
• step 3: click the open button .
Version compatibility tip: revit models are complex databases . Because of these complexities, revit files are not backwards compatible . To say it another way, revit 2022 files will not open in earlier versions of the software, including revit 2019 and revit 2018 . That said, you can upgrade an older revit model by opening it in a newer version of revit .
Saving Projects

• step 2: click the save as button .
• step 3: click the project button .
• step 4: navigate to the folder or portable drive where you want to save the revit project . Type the filename in the save as dialog box .
• step 5: click the save button .
Active and backup project files

• by default, revit keeps three backup project files in the same folder with the active project file .
• the active project name contains the file name and the .rvt extension .
• backup project names are appended with a four-digit number that increases with every new backup . In this example, the 0003.rvt file is the most recent backup .
Tip: keep the backup project files on your computer or portable drive in case the active revit project becomes corrupt or fails to open .
Revit User Interface
Graphical user interface

Revit user interface contains multiple elements that you use to create and modify the revit model . The interface is similar to autocad and other autodesk software .
Parts of the user interface
• the quick access toolbar contains a list of commonly used tools such as save, undo, and aligned dimension .
• ribbon: see page 15 to learn more about the ribbon .
• the options bar is located below the ribbon and displays tools specific to the selected object or active tool .
• the type selector allows you to change the type of element placed in the drawing area .
• properties palette: see page 16 to learn more about the properties palette .
• the drawing area displays views such as floor plans, legends, and schedule .
• project browser: see page 16 to learn more about the project browser .
• the view control bar contains options to adjust the architectural scale and visual properties of the active view .
• the status bar provides instruction and tips on what to do in revit .
Ribbon

The ribbon is divided into several tabs, which contain revit’s core functionality .
• the circulation panel contains the railing, ramp, and stair buttons, all of which are related to building circulation .
Full ribbon state

The full ribbon state is the default layout . Each panel is expanded to show buttons related to the panel .
• click the minimize to panel button to cycle through four different panel states .
Panel tiles ribbon state

The panel tiles ribbon collapses each panel into a large tile with a single icon .
• click the minimize to panel button to cycle to the next panel state .
Panel buttons ribbon state

• reveal each panel’s buttons by hovering the mouse over the panel’s name .
• click the minimize to panel button to cycle to the next panel state .
Panel tabs ribbon state

The panel tabs ribbon completely collapses each tab .
• click the minimize to panel button to cycle to the next panel state .
Project browser

The project browser displays all of the views in the active project . Views are divided into major categories including floor plans, ceiling plans, elevations, details, and 3d views .
This browser shows the default views in a new architectural project . You’ll notice the views are limited to floor plans, ceiling plans, and building elevations . As you add views to the project, revit will place them in the appropriate category . In addition to the architectural views, the project browser contains legend, schedule/quantity, and sheet categories .
Properties palette


The properties palette displays all available information for the selected object in the model .
• when nothing is selected, the properties palette provides information about the current view .
• in this example, the 3d view’s properties can be reviewed and updated in the properties palette .
Video driver errors

Revit relies on your computer’s graphics card to create a sophisticated graphics experience . If you receive graphics errors similar to this example when switching to 3d views, your graphics card may not be compatible with revit’s graphics requirements .
Disabling graphics hardware acceleration

Disabling graphics hardware acceleration in revit often eliminates software crashes . Follow these steps to disable hardware acceleration .
• step 1: in the file tab, click the options button at the bottom of the menu .

• step 3: uncheck the use hardware acceleration box .
• step 4: click the ok button to save the changes .
• step 5 (not shown): you will need to save, close, and re-open your revit projects for this change to take effect . Only documents opened after this change will be affected by the video card change .
Visibility/graphic overrides
The visibility/graphic overrides dialog box is used to control the display categories in the active view . Categories in revit are often compared to layer in autocad . The primary difference is that elements in revit are automatically associated with the correct category while lines in autocad need to be manually assigned to layers .

Controlling model categories
• step 2: the two most commonly used categories groupings are model categories and annotation categories .
• step 3: filter the lists of categories under the model categories tab by selecting architecture .
• step 4: the visibility check box turns the category on or off in the active view . In this example, the doors will be hidden in plan view when the door category visibility is changed to off .
• step 5: the line and pattern overrides allow you to adjust how the category is graphically displayed in the active view . In this example, the cut pattern for the walls category was changed to gray/solid fill .
Controlling annotation categories

Annotative categories contain most elements in a view that contain text including dimensions, room tags, and symbols .
• step 2: filter the lists of categories under the model categories tab by selecting architecture .
• step 3: adjust the visibility and line style for each annotative category in the active view .
Arranging views

Working simultaneously with multiple views in revit allows you to see design changes in both two and three dimensions .
Tab open views
• t w is short for tab windows .
Each open view is presented as a tab as seen in this example . The view name for each window is visible at the top of the window .
• step 3: close any unwanted views by clicking the x .
Tiling open views

Tiling windows is more frequently used when you want to work on multiple views at the same time .
• w t is short for window tile .
Each open view is arranged beside other views as seen in this example .
• step 4 (not shown): type the letter w and then t to re-tile the open views .
Tip: the close inactive views button in the view tab closes all open views except for the current view . This is helpful when you have multiple views open and do not want to close them one at a time .